DIY Kitchen Decor Projects Made Easy
The kitchen is undeniably the heart of every home. It is where cherished meals are prepared, memories are made and meaningful conversations are shared. As the epicentre of activity, the kitchen deserves to be more than just a functional space. It should reflect your style, inspire your culinary adventures and provide a cosy haven for your family and friends to gather. Amidst the hustle and bustle of daily life, it is easy for our kitchens to gradually lose their lustre. That is where the magic of DIY kitchen decor projects comes in. They offer the perfect opportunity to infuse your culinary sanctuary with renewed energy and character. Whether you are an avid DIY enthusiast or a first-time decorator, there is a wealth of creative possibilities waiting to be explored.
Kitchen Cabinet Painting: Revive and Renew
In the ever-evolving world of interior design, trends come and go, leaving us with a dilemma. How can we keep our living spaces up-to-date without breaking the bank? The answer lies in the art of repurposing and reviving. When it comes to the heart of your home, the kitchen, this concept takes on a particularly exciting form. Enter the realm of kitchen cabinet painting. A creative endeavour that allows you to breathe new life into your space while embracing your personal style.
In the realm of DIY Kitchen Decor, the smallest changes often yield the most significant impacts. Kitchen cupboard painting is a testament to this notion, demonstrating that a coat of paint has the power to rejuvenate your space and reflect your evolving style. Whether you opt for a sophisticated neutral or embrace a bold colour, the end result will be a kitchen that not only stands the test of time but also stands out as a testament to your creativity.
A Step-by-Step Guide: How To Paint Kitchen Cabinets
Reviving your kitchen cabinets with a fresh coat of kitchen spray paint can breathe new life into your cooking space. The process may sound daunting but with the right guidance, it is a DIY Kitchen Decor project that you can tackle successfully. Here is a comprehensive step-by-step guide to painting your kitchen cabinets and achieving a professional finish that transforms your kitchen’s aesthetic.
Step 1: Preparation is Key
Before you begin, ensure you have all the necessary tools and materials. Clear a workspace and protect surrounding surfaces with drop cloths or plastic sheets. Begin by removing the cabinet doors and hardware using a screwdriver. This will give you easier access to the surfaces you are painting.
Step 2: Clean and Sand
Thoroughly clean the cabinet surfaces to remove grease, dirt and grime that might hinder paint adhesion. A mixture of water and mild detergent works well for this or a concentrated sugar soap. Once cleaned, lightly sand the surfaces with a fine-grit sandpaper. Sanding creates a slightly rough texture that helps the paint adhere better, ensuring a longer-lasting finish.
Step 3: Apply Primer
Priming is a crucial step to achieving a smooth and even paint finish. Choose a primer that is suitable for the material of your cabinets – wood, laminate or another surface. Apply the primer using a paintbrush or a paint roller, following the manufacturer’s instructions. Primer not only improves paint adhesion but also prevents any underlying stains or colours from bleeding through the new paint.
Step 4: Embrace Your Chosen Paint Color
Once the primer is fully dry, it is time to bring in your chosen kitchen spray paint colour. Opt for a paint that is specifically formulated for cabinets or furniture. Choose a high-quality kitchen cabinet paint with a durable finish to ensure the longevity of your project. Follow the manufacturer’s instructions for proper application and drying times.
Step 5: Apply Thin, Even Coats
When it comes to painting, patience is key. Apply thin, even coats of paint to prevent drips and achieve a professional finish. It is better to apply multiple thin coats rather than one thick coat. Allow each coat to dry fully before applying the next. Depending on the colour and type of paint you are using, you might need two to three coats for optimal coverage.
Step 6: Consider a Protective Topcoat
For added durability and to protect your newly painted cabinets from everyday wear and tear, consider applying a protective topcoat. Polyurethane or a clear sealant designed for furniture can provide an extra layer of protection while enhancing the overall appearance.
Step 7: Reassemble and Enjoy
Once the final coat of paint and any protective topcoat are completely dry, it is time to reattach the cabinet doors and hardware. Take care to handle the freshly painted surfaces gently to avoid any smudging or scratching. Tighten the hardware securely and admire your newly transformed kitchen cabinets.
What Colour To Paint Kitchen Cabinets?
Elevate your kitchen’s charm by breaking away from traditional neutrals and wood tones. While traditional neutrals and wood tones have long dominated kitchen cabinet choices, a new wave of design innovation invites you to break free from the ordinary. By exploring unconventional cabinet colours, you have the power to infuse your kitchen with a fresh charm that reflects your unique personality.
Green Kitchen Cabinets
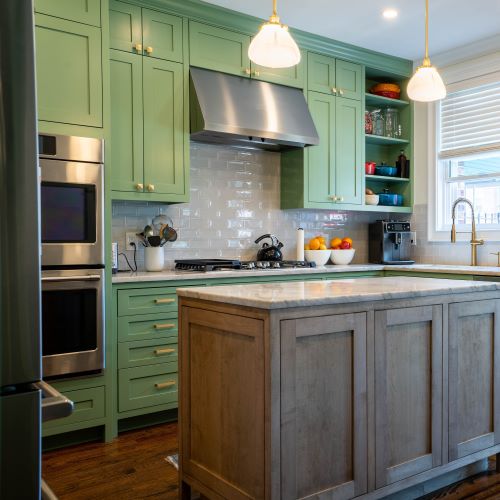
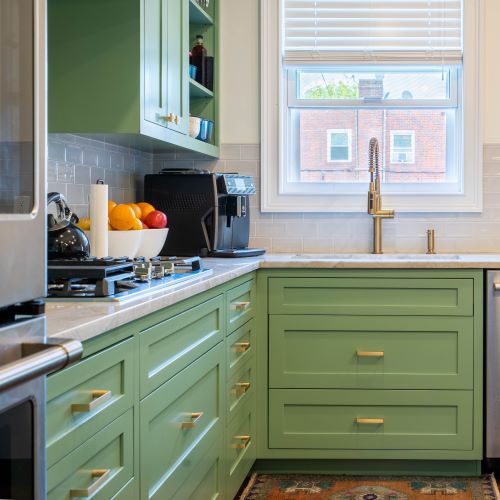
Opt for green kitchen cabinets. Whether it is the calming subtlety of sage green kitchen cabinets or the luxurious depth of emerald. Green kitchen cabinets inject a refreshing burst of creativity into your culinary space. By embracing this unconventional choice in your DIY Kitchen Decor, you are infusing your kitchen with nature’s vibe and crafting a uniquely expressive atmosphere. Let your kitchen cabinets stand as a statement of personal style while harmonising with complementary elements. Creating a cohesive palette that redefines your kitchen’s identity.
Grey Kitchen Cabinets
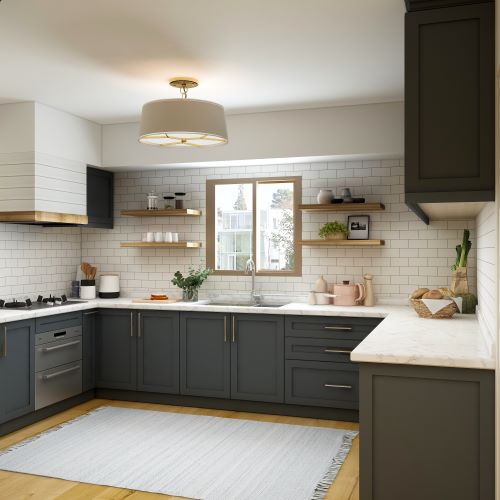
Amidst the spectrum of cabinet colours, one hue stands out for its timeless sophistication: grey. As a neutral with depth, grey offers a canvas for both bold and understated design choices. Whether you opt for a light dove grey or a deep charcoal, painting your kitchen cabinets in shades of grey provides the perfect backdrop to amplify your kitchen’s style. This hue effortlessly complements various colour palettes and materials, ensuring your kitchen remains an elegant and inviting space for years to come.


How To Hide The Boiler In The Kitchen
If you are wondering how to hide the boiler in the kitchen, you are not the only one. Unsightly boilers can be a visual distraction in your kitchen, disrupting the overall ambience you have carefully curated. But fear not, with a touch of ingenuity, you can transform this utilitarian necessity into an integral part of your kitchen’s design narrative. Concealing the boiler is not just about hiding it; it’s about elevating your kitchen’s aesthetic and maintaining a seamless flow in the space.
Custom Boiler Cabinetry
One of the most effective ways to hide a boiler is by crafting a custom cabinet around it. This solution not only camouflages the boiler but also creates an opportunity to integrate it seamlessly into your kitchen’s architecture. The cabinet serves as a double agent – concealing the boiler while offering additional storage or functional space, such as a countertop.
Customisation is the key to making this solution work wonders for your kitchen. When designing the cabinet, consider your existing cabinetry and design elements. You have the option to match the cabinet colour precisely to your current cabinetry, creating a cohesive and uniform appearance. On the other hand, you can also use this as a chance to introduce a subtle contrast by painting the cabinet a complementary colour that enhances your kitchen’s colour palette.
How To Organise Kitchen Cupboards
The kitchen is a hub of activity, where culinary creativity comes to life. However, amidst the whirlwind of cooking, meal prep and daily use, kitchen cupboards often become cluttered and chaotic. Fear not! With a thoughtful approach to kitchen cupboard organisation, you can transform your kitchen cupboards into efficient, well-arranged spaces that enhance both functionality and your overall cooking experience.
Step 1: Begin with a Decluttering
Before diving into the world of storage solutions, embark on a decluttering mission. Open those cupboards and honestly assess the items within. Discard or donate items you no longer use or need. Say goodbye to mismatched containers, utensils that have seen better days and duplicates that only take up valuable space. This initial purge sets the stage for an organised, clutter-free kitchen.
Step 2: Harness the Power of Storage Solutions
Once you have pared down your kitchen collection, it is time to introduce kitchen storage solutions that will revolutionise your kitchen cupboards. Shelf risers are a simple yet effective way to maximise vertical space, allowing you to create two tiers within a single shelf. Drawer dividers are a blessing for utensil drawers, ensuring everything has its designated place.
Clear containers are game changers as they keep similar items grouped together and make it easy to spot what you need. From pasta to snacks, the transparent design lets you quickly identify the contents without rummaging through everything.
Step 3: Grouping by Purpose and Frequency
Organising is not just about tidiness; it is about functionality. Group similar items together based on their purpose. Keep all baking essentials in one spot, gather your cooking utensils and designate a space for canned goods. This grouping not only streamlines your cooking process but also saves you precious time when you are in the midst of cooking and baking.
Consider the frequency of use when arranging items. Place everyday essentials within easy reach, while items used less frequently can be stored on higher shelves. This practice ensures that your kitchen is tailored to your needs, enhancing convenience and accessibility.
Step 4: The Joy of Labels
Labels are your best friends in the world of organisation. Invest in a label maker or simply use adhesive labels to mark containers, baskets and shelves. This not only adds a touch of orderliness but also makes it effortless to find exactly what you are looking for.
Step 5: Maintain and Reevaluate
Organisation is not a one-time project; it is an ongoing process. Regularly revisit your kitchen cupboards to ensure everything remains in its designated place. As your cooking habits evolve, your organisation system might need adjustments. Perhaps you are using certain items more frequently than anticipated. Adjust their placement accordingly.
What Colour Should I Paint The Kitchen?
When it comes to kitchen design, the colors you choose for your DIY Kitchen Decor projects play a pivotal role in setting the tone and atmosphere of this bustling hub. Whether you are embarking on a full-scale renovation or simply seeking a quick refresh, selecting the right colors to paint your kitchen is a decision that can transform the space from mundane to magnificent.
The Green Spectrum
The beauty of green lies in its diversity. From soft, muted tones to deep, intense shades, there is a green for every personality and style. If you are drawn to a more understated elegance, consider the soothing charm of sage green kitchen cabinets or sage green kitchen walls. This hue exudes a sense of calm and pairs wonderfully with a variety of decor styles. On the other end of the spectrum, you have the majestic emerald green, which brings a touch of opulence and drama to your kitchen. And if you are seeking a balance between the two, explore the world of mid-tone greens that offer a harmonious blend of depth and subtlety.
The Modern Pink
The idea of a modern pink kitchen stands out as a bold and unconventional choice. While pink might have traditionally been associated with nurseries or feminine spaces, its potential in the culinary domain is nothing short of remarkable. So, for those that love a vibrant burst of colour, why not consider embracing a modern pink kitchen?
When we think of pink, visions of delicate roses and childhood fantasies may come to mind. However, the modern pink kitchen elevates this hue to a whole new level of sophistication. Pink, when chosen thoughtfully and combined with the right elements, can introduce an unexpected layer of elegance to your cooking space. It is a way to break away from the expected neutrals and add a touch of vivaciousness that infuses the room with energy and charm.
Timeless Navy Blue
If you are seeking a colour trend that effortlessly combines classic elegance with modern allure, look no further than the shade of navy blue. Navy blue has emerged as a bold choice for kitchen spaces. It has timeless appeal and the ability to create a sense of depth and richness. A navy blue kitchen is an invitation to infuse your cooking haven with understated sophistication.
Its timeless quality makes it a versatile choice that can adapt to a range of design aesthetics, from traditional to contemporary. It serves as a strong foundation that complements a variety of colour palettes, textures and materials, making it a staple for both the minimalistic and the eclectic. Navy blue possesses a remarkable ability to create a soothing and tranquil atmosphere. Unlike its brighter counterparts, navy blue encourages a sense of relaxation.


What Colour Splashback Goes with A Grey Kitchen?
In the realm of kitchen design, the splashback stands as a canvas of creativity, a focal point that has the power to tie the entire space together. When it comes to complementing a grey kitchen, the spectrum of splashback colors opens up an array of exciting possibilities.
White Subway Tiles
For those seeking a timeless and cohesive look, the classic choice of a white subway tile splashback is a match made in design heaven. The clean lines and simplicity of white tiles effortlessly harmonise with the neutral elegance of a grey kitchen. This creates a backdrop that is visually calming yet striking. This choice not only complements the grey tones but also enhances the sense of light and space, resulting in a kitchen that feels open and inviting.
Soft Teal or Blue
Infusing your grey kitchen with a pop of colour adds a layer of personality and charm. Soft teal or dusty blue splashbacks provide a refreshing contrast that is both inviting and intriguing. These shades evoke a sense of serenity and nature. Creating a mix between the cool tones of grey and the soothing hues of blue. The result is a kitchen that oozes a balanced energy and captures the essence of contemporary style.
Mirrored or Metallic
For those with a penchant for modern aesthetics, mirrored or metallic splashbacks offer a touch of glamour and sophistication. Mirrored surfaces reflect light, amplifying the sense of space and brightness in your kitchen. Metallic finishes, whether silver, bronze or gold, introduce a visual depth that complements the grey tones while adding an element of intrigue. These choices create a stunning juxtaposition between the cool neutrality of grey and the appeal of reflective surfaces.
Which DIY Kitchen Decor Project Will You Choose?
As you navigate the world of DIY Kitchen Decor projects and organisation, remember that functionality goes hand in hand with style. Embracing DIY projects, such as painting kitchen cabinets or concealing boilers, adds a personal touch that elevates your kitchen’s charm. The choices you make have the power to transform your kitchen into a space that reflects your personality and meets your needs. Whether you are daring to depart from tradition with green kitchen cabinets, embracing the elegance of navy blue or introducing the refreshing charm of pink, each colour trend brings its own magic to your kitchen’s story.